An introduction to 'tilt' lens photography

Tim Parkin
Amateur Photographer who plays with big cameras and film when in between digital photographs.
As people quest for more resolution and sharper pictures, they invariably encounter someone singing the praises of tilt-shift lenses. Most commonly used in close up product or architectural photography, these lenses allow the photographer to choose where the plane of sharp focus lies and also choose to correct or to manipulate perspective (to a limited extent). It is the ability to control where the plane of focus lies that we will cover in this article (we will come back to the perspective correction in the next issue).
The first thing that we need to understand is how focussing works in cameras. In order to do this, it is useful to look at the large format camera as these have the simplest lenses and are basically just a flexible box with a lens at one end and the ‘sensor’ at the other.
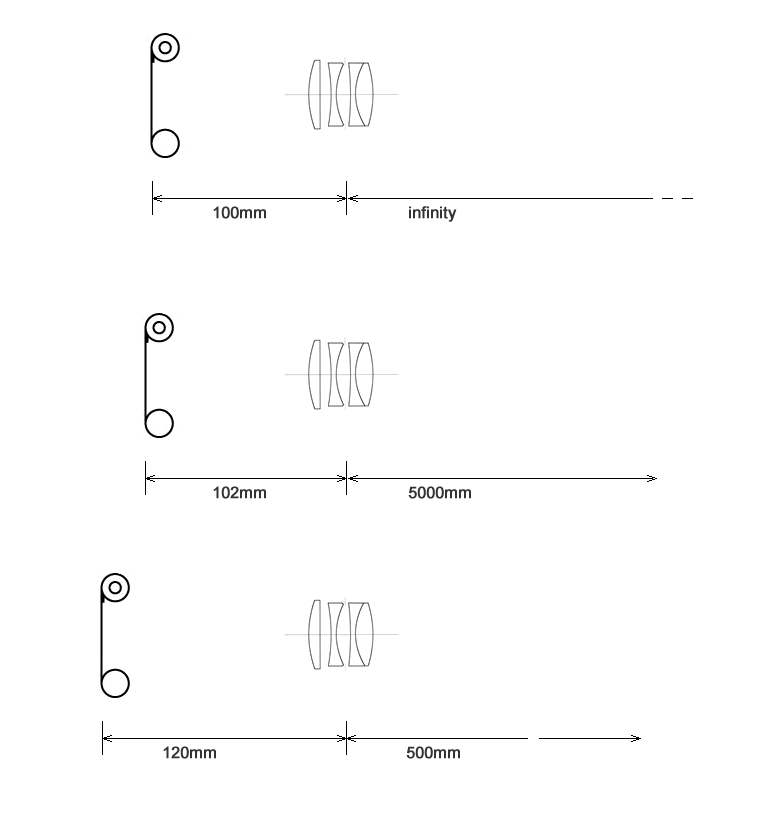
A lens of 100mm is focused on infinity when the distance between the ‘sensor’ and the lens is 100mm (see the diagram below).
Also, in order to focus closer than infinity, you need to make the distance between the sensor and the lens longer. (the actual equation is 1/sensor to lens + 1/lens to object = 1/focal length)
In summary, to focus closer we make the distance from lens to sensor bigger.
This is often masked in modern lenses because they use ‘internal’ focussing elements that move whilst keeping the front element stationary.
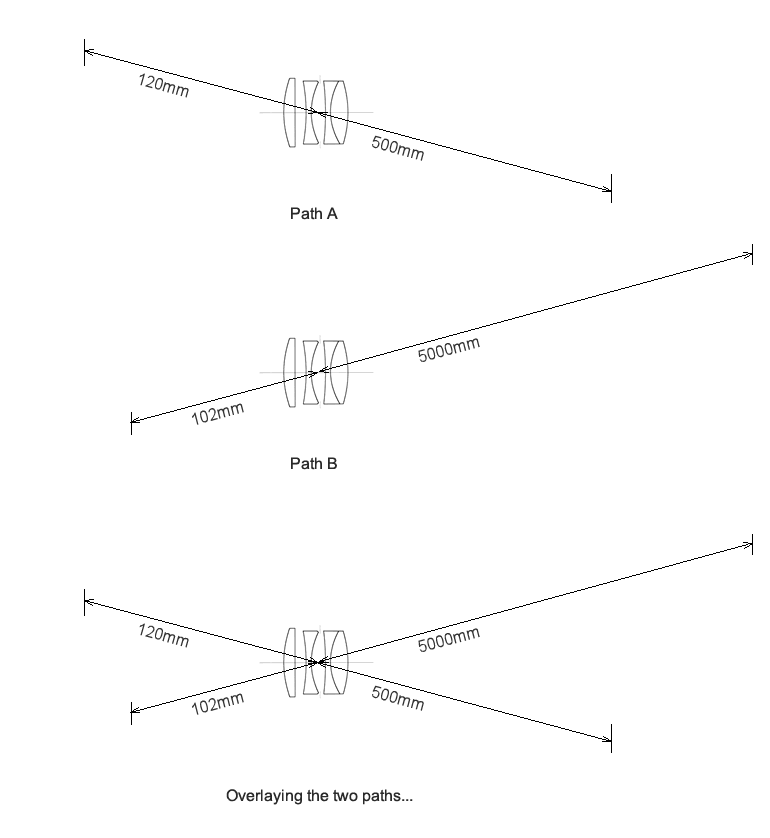
In the diagram below we can see what happens if we show two different paths of light. One focussed close and one focussed further away. The diagram also shows why the image on the sensor is upside down (all light paths pass through the lens).
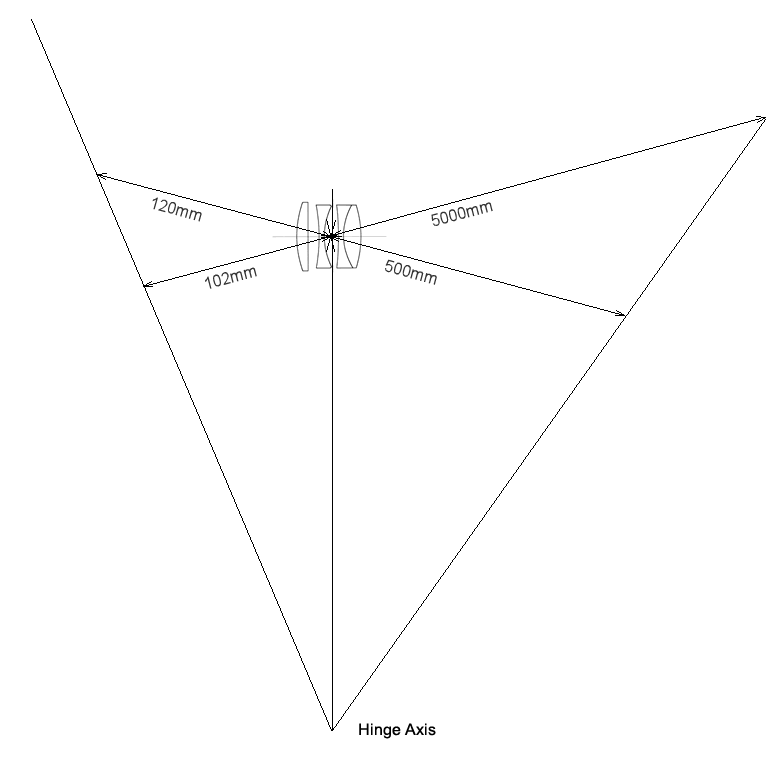
The last image above shows both light paths shown using a single lens. We can imagine that the ‘target’ of both of these light paths as two little sensors. Or, if we look at the diagram below, we can see that the same would be true of a tilted sensor.
As you can see, each point on the sensor relates to an ‘in focus’ point on the landscape side of the camera. The plane of the sensor, the plane of the lens and the plane of sharp focus coincide at a single point (Hey! Mr Scheumpflug!).
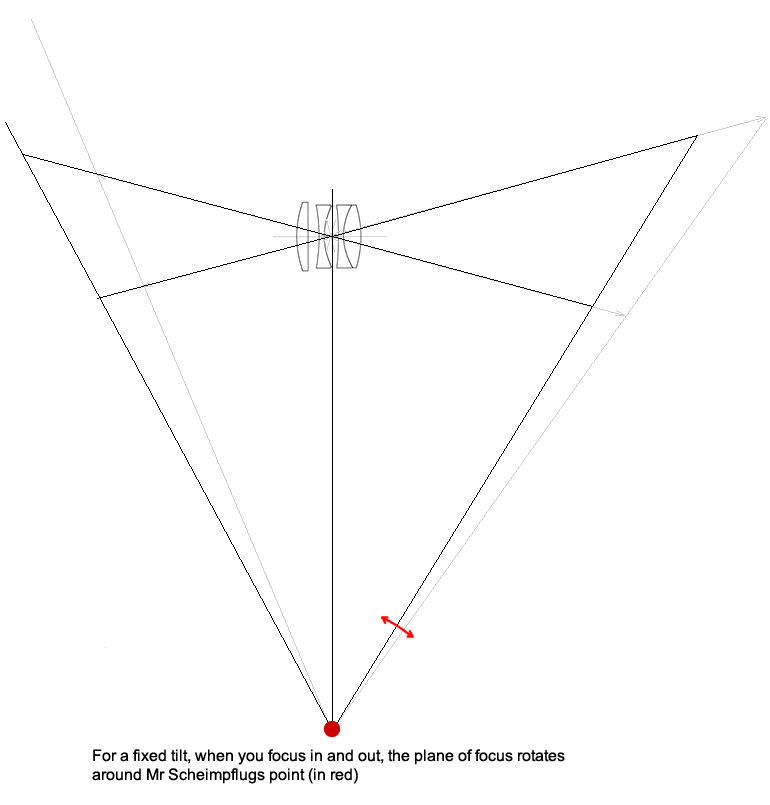
So what happens when you focus? Well, inside the lens an element is moving backwards and forwards. If we focus closer, the lens element moves further away from the sensor. Take a look at what that means for the plane of sharp focus.
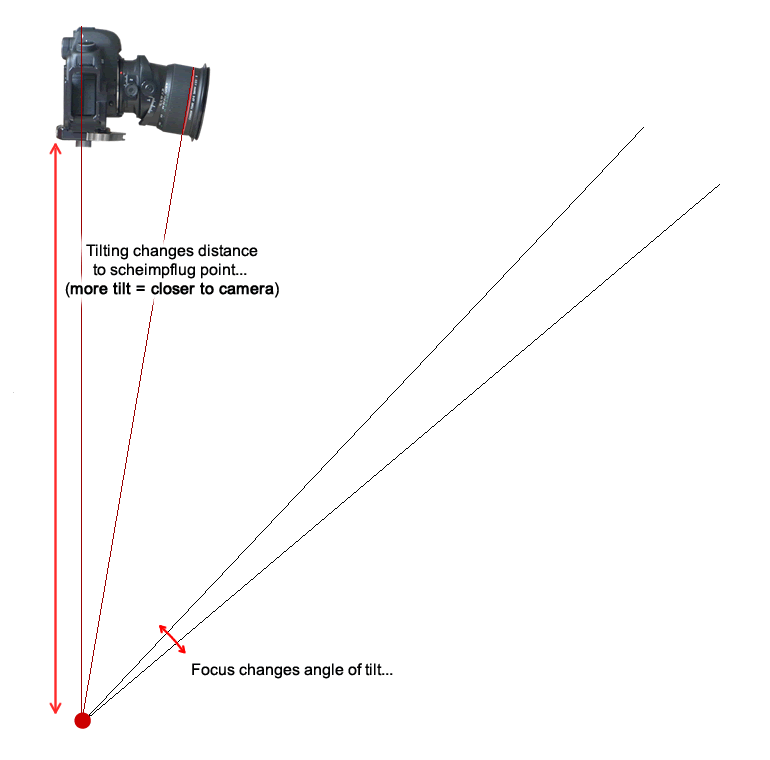
So in summary, when you tilt a lens you can draw a line through the lens plane and the sensor plane and where they meet will be the axis around which the focal plane moves. If the lens is tilted more, that axis gets closer to the camera. When the lens is tilted less, the axis moves away from the camera.
When you focus the lens, you are effectively moving the lens (or lens nodal point) closer to or further away from the camera. This ends up rotating the sharp focus plane around the ‘hinge line’ (OK, it looks like a point on the diagram but it’s actually a line going into the paper).
The following diagram shows this
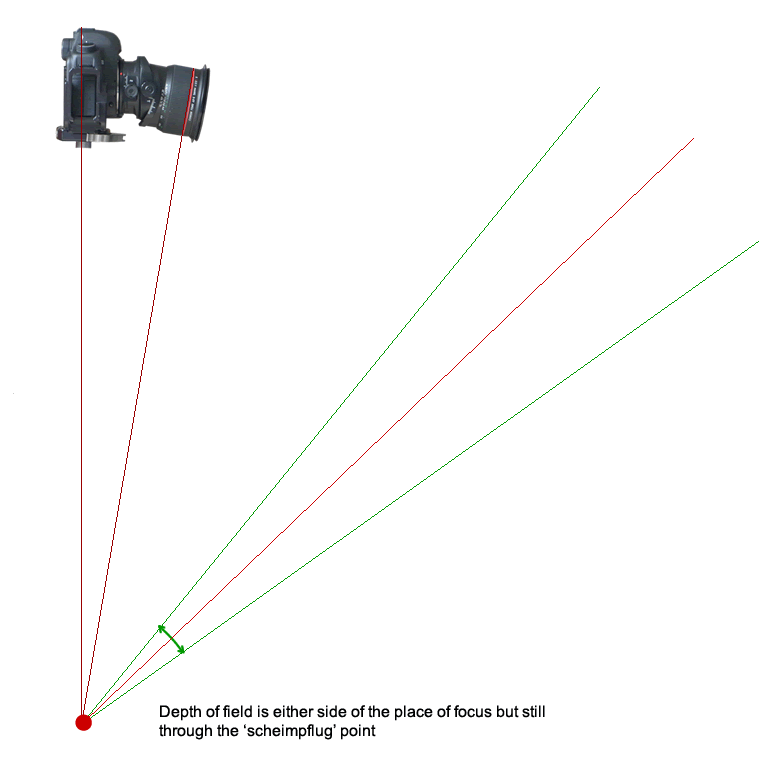
Now depth of field with a tilted focus plane causes some people some trouble to understand. However it’s actually fairly simple. Your depth of field gives acceptable sharpness from an area focussed closer to the camera to an area focussed further away from the camera. Hence, if we show the plane slightly closer to the camera and the plane slightly further away from the camera, you can see that the area of acceptable sharpness is actually wedge shaped.
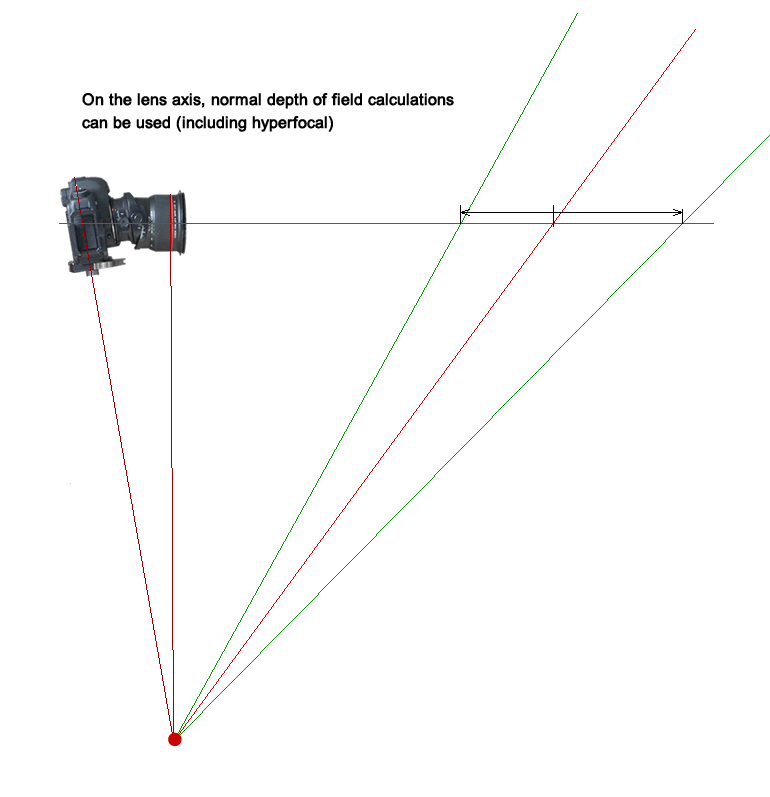
The last thing that is interesting here is that having gone through all of the maths (so you don’t have to) hyperfocal focus still applies along the lens axis (actually it isn’t that complicated, depth of field is normally calculated for a single line and then extrapolated for the whole perpendicular plane. In the tilted case we work out depth of field for a single line as per normal, but we are then constrained by all focal planes passing through the hinge point.
Practical Conclusions from the Above
A few things can be concluded from the information given above and that can be useful when working in the field.
1) You can work out an approximate tilt needed by looking at the plane of focus you want, working out where that plane of focus meets a line drawn through the sensor and then tilting the lens until it also points at the same line. This will usually be enough to get you pretty close for focussing.
2) Depth of field is a *lot* smaller nearer to the camera than farther away. Hence you don’t need to have the plane of focus directly hitting the horizon in a big view. If you do have it hitting the horizon, you are wasting half of your depth of field on the sky! Have a look at the diagram below
3) Your depth of field gets smaller the more you tilt. This isn’t easy to see without flipping between multiple pictures so we’ll take a detour.
I must admit to using my large format camera for most of my tilting and shifting and in the process of learning how to use it I heard someone espousing a concept called ‘microtilts’. The theory was that if you could apply a fractional amount of tilt, nearly everything would come into focus. I had a suspicion that this was a load of cobblers but looking at Harold Merklinger’s books on camera movements (very clever books but not recommended reading) it did seem to imply that this was the case (although I had a sneaky feeling that the maths was hitting the edges of the assumptions). Anyway, I wanted to see what was going on for myself and so I wrote a tilt shift simulator. That simulator allows a user to pick their lens, tilt, circle of confusion, etc, etc. and to play around and see what the depth of field and focal plane actually was.
Well - I’ve tweaked it slightly for DSLR users and here it is..
http://static.timparkin.co.uk/static/dslr-tilt-shift
It will work best Google Chrome, Safari or later versions of Firefox. If the sliders aren’t showing on the right hand side of the screen, zoom out a bit and things should snap into place.
Anyway, now we can take a look at this “depth of field getting smaller” thing. Click on the following link which is set up for hyperfocal focussing and slide the ‘lens tilt’ slider up to 1.6 degrees and back again. This is modelling the 24mm tilt shift lens at f/5.6 and using a circle of confusion that allows you to blow up prints to 10”x15” enlargement (i.e. a 10x enlargement which gives CoC = 0.2/10 = 0.02)
Click here to see what happens to the depth of field using hyperfocal technique. Play with the tilt and notice that some parts of the picture go further out of focus and some come into focus. Imagine you had a tree in the foreground of the picture.
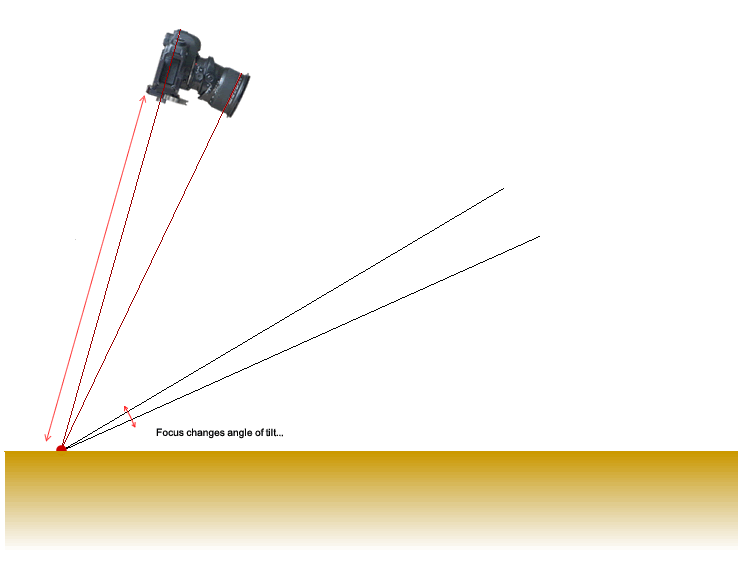
The following table will work for most of the tilt shift lenses available and covers the 17mm, 24mm, 45mm and 90mm focal lengths. The idea here is to take a look down the table column of your lens and pick the distance (in meters) that is closest to the distance you want the focal plane to cross underneath your camera. (e.g. take a look at the distance from the camera to the red dots in the diagrams above). Then read off the number of degrees in the left hand column and apply it to your lens. You can then focus the lens in and out knowing that the plane of focus will always pass the same distance underneath your feet.
I'll give you an example. Let's say you set you camera up to take a photograph of the death valley floor (notice I chose a nice easy flat surface). You point your camera slightly downward to get your shot and then you draw a line from the back of the sensor down to the ground. It might look like the diagram below..
Measure the distance, let's say it is 0.7m, and look up the closest distance in the table for your lens, let's say 24mm. The table says that the tilt should be approx 2 degrees. Apply this amount of tilt and then focus the camera until the rest of the desert floor comes into focus.
You can see clearly from this diagram that longer lenses need more tilt..
|
deg/lens |
17 |
24 |
45 |
90 |
|
8° |
0.12 |
0.17 |
0.33 |
0.66 |
|
7° |
0.14 |
0.20 |
0.37 |
0.74 |
|
6° |
0.16 |
0.23 |
0.43 |
0.86 |
|
5° |
0.20 |
0.28 |
0.50 |
1.00 |
|
4° |
0.25 |
0.34 |
0.65 |
1.30 |
|
3° |
0.32 |
0.46 |
0.85 |
1.70 |
|
2° |
0.48 |
0.70 |
1.30 |
2.60 |
|
1.5° |
0.65 |
0.90 |
1.70 |
3.40 |
|
1° |
1.00 |
1.40 |
2.60 |
5.40 |
|
0.5° |
2.00 |
2.80 |
5.40 |
10.80 |
Hopefully that is enough for this issue. For the next issue I'll be taking a look at some techniques to get best focal length and also looking at how using rise/fall/shift can help you rebalance your photographs.


